Configuring Data for Slides
When your template contains data-connected shapes (charts, tables, or text fields linked to data collections or transformations), you need to configure which specific data to use before generating slides.
The Data Configuration Modal
When you start a new slide deck that uses a template with data-connected shapes, the Data Configuration Modal appears. This is where you specify parameters that identify which data files to use.
Modal Structure
The modal has three main sections:
1. Global Parameters Form
At the top, you'll see input fields for all unique parameters used across data-connected shapes:
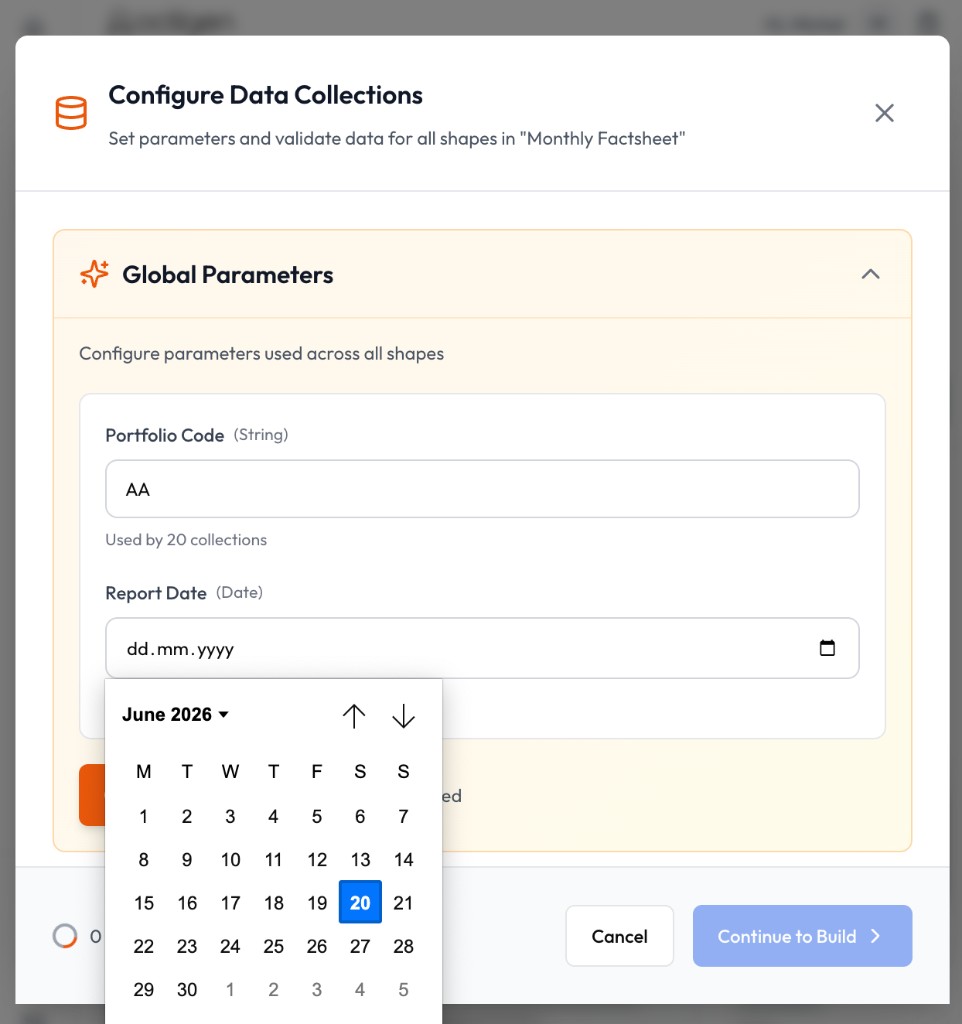
Input types match parameter types:
- Date parameters → Date picker
- String parameters → Text input
- Integer parameters → Number input
2. Shape List
Below the global form, you see all data-connected shapes grouped by deck position. Each group can be expanded to show its shapes:
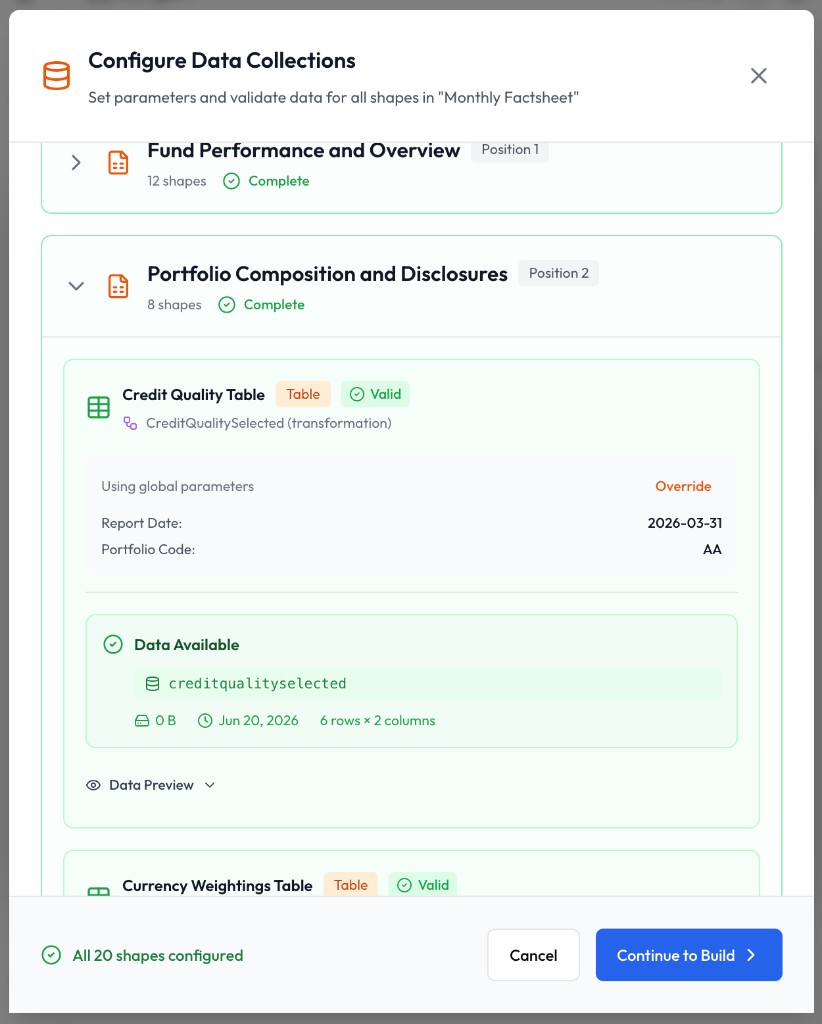
Each shape card shows:
- Shape name and type (chart, table, or text field)
- Data source (collection or transformation) it's linked to
- Whether it uses global or custom parameters
- Validation status with details
3. Footer
The footer summarizes the configuration status and provides the actions to continue or cancel (visible at the bottom of the modal above):
- Status line - e.g. "All 20 shapes configured" when every shape has validated successfully
- Cancel - closes the modal without saving
- Continue to Build - proceeds to the next phase; enabled only when all shapes are validated successfully
The Configuration Workflow
Step 1: Enter Global Parameters
Fill in the parameter values that apply to most or all shapes:
Example:
- Valuation Date: 2024-12-01
- Portfolio ID: GROWTH_FUND
These values will be used for all shapes by default.
Step 2: Validate & Apply
Click the "Validate & Apply" button. The system:
- Sends a validation request for each data-connected shape
- Checks if a data file exists matching the parameters
- If found: fetches the data and shows metadata
- If not found: shows an error with details
During validation:
- A spinner shows on each shape being validated
- Progress updates as shapes complete
- Overall status updates in the header
Step 3: Review Results
After validation, each shape shows one of:
✅ Success:
Status: ✅ Data available
  • Object: GROWTH_FUND_2024-12-01
  • Size: 52 KB, 245 rows × 8 columns
  • Modified: Dec 1, 2024

[Preview Data ▼]
❌ Error:
Status: ❌ Error
  File not found for date 2024-12-01

Suggestion: Check if data has been uploaded for this date.
Step 4: Handle Errors (if any)
For shapes with errors, you have options:
Option A: Fix the global parameter
- Maybe the date is wrong
- Update in the global form and re-validate
Option B: Override with custom parameters
- Click "Override Parameters"
- Enter shape-specific values
- Click "Revalidate" for that shape
Option C: Skip this shape
- Not possible - all shapes must validate before continuing
- This ensures your presentation has all required data
Step 5: Continue
Once all shapes show ✅, click "Continue to Build" to proceed with the slide deck creation.
Overriding Parameters
Sometimes a specific shape needs different parameter values than the rest.
When to Override
- One chart needs last month's data while others need current
- A table shows a different portfolio than the main charts
- Historical comparison shapes with older dates
How to Override
- Click "Override Parameters" on the shape
- The shape expands to show parameter inputs (pre-filled with global values)
- Modify the values as needed
- Click "Revalidate" to check the new parameters
- The shape now shows "⚙️ Custom" instead of "✓ Using global"
Returning to Global
If you change your mind:
- Click "Use Global" on an overridden shape
- Shape reverts to using global parameters
- May need to re-validate
Previewing Data
For validated shapes, you can preview the actual data:
- Click "Preview Data ▼"
- Expands to show a data table
- Shows first 10 rows
- Includes column headers
For text field connections, the preview is still tabular - the populate phase maps each row to a paragraph and each cell to a text run.
This helps verify you're getting the right data before proceeding.
Validation Status Indicators
Shape Status Colors
| Color | Meaning |
|---|---|
| 🔵 Blue | Validating in progress |
| 🟢 Green | Data found and loaded |
| 🔴 Red | Error - data not found or invalid |
| ⚪ Gray | Not yet validated |
Overall Status
The header shows overall validation progress:
- Not validated - No validation attempted yet
- Validating... - Currently checking shapes
- All X shapes validated - All successful
- X errors - Some shapes failed validation
Error Messages and Solutions
"File not found for parameters"
Meaning: No data file exists matching the specified parameters.
Solutions:
- Check if the data has been uploaded to the collection
- Verify the parameter values are correct (especially dates)
- Use "Override Parameters" to try different values
- Upload the missing data file if needed
"Missing required parameter"
Meaning: A required parameter wasn't provided.
Solutions:
- Fill in all fields in the global parameters form
- For overridden shapes, ensure all required fields have values
"Invalid parameter value"
Meaning: A parameter value doesn't match the expected format.
Solutions:
- For dates: use YYYY-MM-DD format
- For integers: use only numbers
- Check for typos in string values
"Network error"
Meaning: Couldn't connect to the server.
Solutions:
- Check your internet connection
- Try validating again
- Refresh the page if issues persist
Templates Without Data Connections
If your template has no data-connected shapes, the Data Configuration Modal is skipped entirely. You'll proceed directly to the Build phase.
Workflow Pre-Configuration
When using a workflow that specifies default data configuration, those values may be pre-filled in the modal. You can still modify them before validation.
Best Practices
Before Opening the Modal
- Know what data you need (dates, portfolio IDs, etc.)
- Verify the data has been uploaded to the relevant collections
- Have correct parameter values ready
During Configuration
- Start with global parameters for the most common case
- Override only when specific shapes truly need different data
- Preview data to verify before continuing
- Don't skip validation - it prevents errors during generation
If Something's Wrong
- Check the collection to see what files are available
- Upload missing data before retrying
- Use different parameter values if the originally planned data isn't available
What Happens to Validated Data
Once you click "Continue":
- Data is cached - No need to re-fetch during slide generation
- Metadata is stored - Row counts, file info available throughout
- Content pieces created - Data objects appear in your content list
- Shapes are linked - Each shape knows its data source
During the Populate phase, the validated data is used to fill charts and tables automatically.
Next Steps
- Use Data in Presentations - Work with data during slide creation
- Learn about Data Collections - Organize your data files
- Return to Data Overview - Review the big picture